Showing posts with label EOTD. Show all posts

Friday, June 1, 2012

Pretty Peacock Eyeliner Two Ways: A Tutorial

Hello there! I have been addicted to Pinterest lately, and I came across a beautiful picture, which I'll share at the end of this post. I wanted to recreate the look for my brown eyes. After doing it similar to the picture, I decided to put the color on my upper lash line instead. So here are my two different peacock eyeliner looks! I'll have a list of products used below the pictures!! Make sure you click on the pictures to get a better look at them!

Lower Lash Line Peacock Liner:
This is a subtly dramatic look that is good for a night out. 
-Maybelline Color Tattoo in Too Cool as overall base.
-Mac Painterly Paint Pot as base for lower lash line.
-Sweep shimmery bronze shade all over lid and crease area.
-Take purple, blue, and green liner to line bottom lash line. This will be a base for the eyeshadow. I used a Turquoise and Amethyst liner.
- Pat coordinating eyeshadow on top of the liner. Start with the purple, then work your way from blue to green. This makes blending much easier.
-Apply shimmery champagne shade to inner corner & brow.
-Line upper lash line, I used a liquid liner & line lower water line, I used a pencil.
-Also, I think it would look better if you tight lined your upper water line. I didn't do this, but I think it would have looked better.
-Curl lashes & apply mascara!


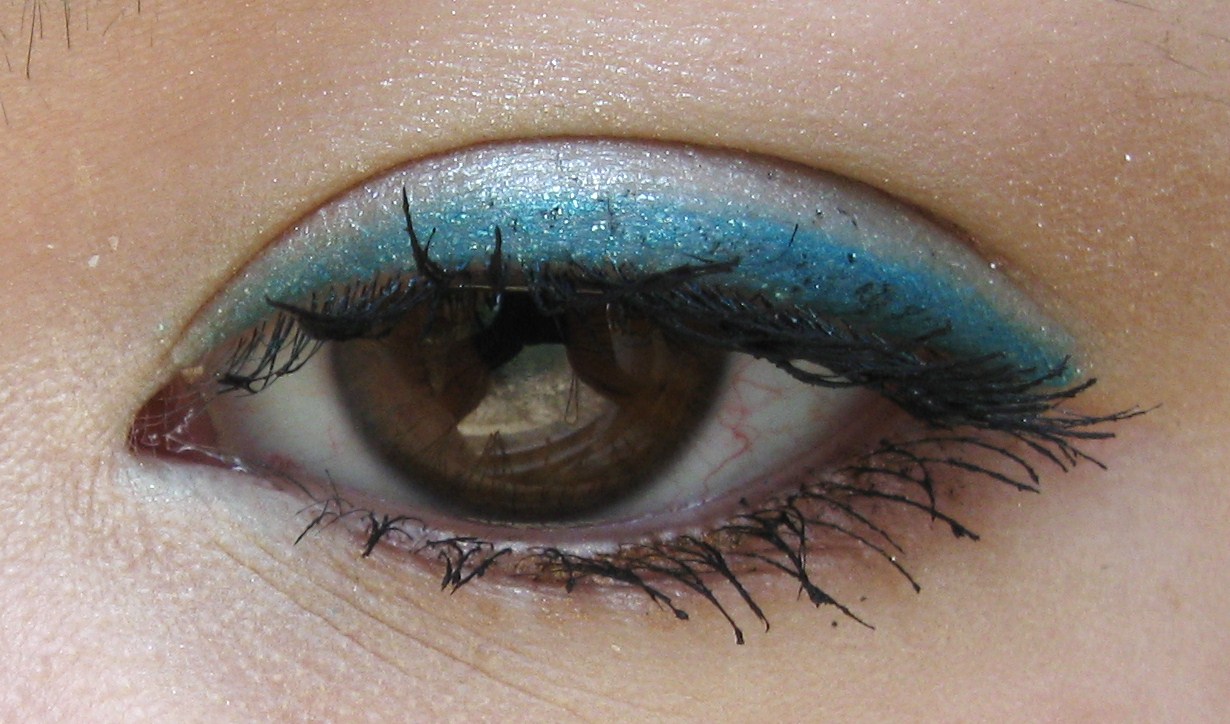
Upper Lash Line Peacock Liner:
This is a more wearable colorful look.
-Apply base all over lid, I used Maybelline Color Tattoo in Too Cool.
-Again, use the colored pencil liners as a base for the eyeshadows, this time on the upper lash line.
-Dampen a thin liner brush in water and squeeze excess water from the brush.
-Start with purple eyeshadow, then blue and green. Make sure to pat it on, don't sweep it. Gently blend.
-Sweep a bronze shade all over lid and crease, avoiding the liner.
-Apply shimmery champagne shade to inner corner & brow.
-Line as close to your lashes as you can with a black gel liner. 
-Line lower water line with black pencil & lower lash line with a bronze pencil.
-Again, I think it would have looked better if it tight lined my upper water line.
-Curl lashes & apply mascara!


Inspiration For This Look:


Products Used:
Elf Little Black Beauty Book Vol.1
L'oreal Hip Duo in Showy
Maybelline Duos in Lasting Lilac & Shocking Seas
Maybelline Color Tattoo in Too Cool
Mac Paint Pot in Painterly
L'oreal Voluminous mascara
Wet n Wild Color Icon pencils in Bronze, Amethyst, and Turquoise 
Maybelline Master Drama eyeliner in Onyx
Maybelline Line Stiletto liquid liner in Blackest Black
Physicians Formula gel liner


I hope you enjoyed this eye look! I love doing colorful looks every now and then. I like to believe that I am improving on applying makeup, being more creative, and taking better photos of my makeup looks. Here are the eye looks I have done in the past, and you can expect to see more in the near future! Click on a look if you are interested in learning how to do them! :)


Please have a lovely day!!!

Tuesday, May 8, 2012

Mermaid Freeze: An Eye Tutorial

Hello there! I have a quick eye look I created purely out of boredom. I recently bought a L'Oreal Hip eye shadow duo in "Showy". It is SO pretty. It has a greenish-blue turquoise shade, and a deep navy blue. This duo was on clearance at Target for about $2.00. Here's the look...please excuse the pictures. They weren't in the best lighting, and they are quite blurry. Also, you can' see the true colors of the shadow here. But you get the idea!


Products Used:
Mac Painterly Paint Pot & Maybelline Color Tattoo in Too Cool
Maybelline eye shadow duo in Shocking Seas
L'Oreal Hip eye shadow duo in Showy
Maybelline Linestilleto liquid eyeliner
Wet n Wild Color Icon pencil in Turquoise (as a base & on bottom lash line)
Wet n Wild Color Icon pencil in White (waterline)
L'oreal Voluminous Million Lashes mascara

L'oreal Hip Showy, Maybelline Shocking Seas

L'oreal Showy

Maybelline Shocking Seas

This isn't the most wearable look. I was just really bored and wanted to try something fun and colorful! You will probably see a lot more random, colorful eye looks in the near future! =)


Tuesday, August 9, 2011

Quick EOTD: Turquoise & Bronze Liner

Hello there! I've got a really fast "eye of the day" to share with you! It won't be a full tutorial, just some pictures and comments! The pictures are a bit blurry, sorry about that! =)

Products I used:
-Covergirl Eye Enhancer single in Tapestry Taupe[dusted all over lid]
-NYC Eyeliner pencil in Jet Black[Upper tightline]
-Wet N Wild Turquoise pencil[Upper lash line]
-Wet N Wild Bronzed pencil[Lower lash line]
-Rimmel Max Volume Flash mascara[upper lashes]
-Estee Lauder Zero Wear mascara[upper & lower lashes]


And that's it! 
Have a lovely day!
=)

Thursday, July 21, 2011

EOTD: Tropical Sunset Smoothie Eyes


Hello there! I was inspired to do an eye look that juicystar07 did on her youtube channel. She was inspired by some European picture, and she inspired me! LOL This is a pretty colorful look, but I toned it down a bit so it is pretty wearable. You could wear this to a party, dinner, or just anytime you want! The eyeshadow look is very similar to my Summer Sunflower Eyes ETOD. It was pretty simple to do, and I used all drugstore products. So, I'm just going to jump right into it! =)
*** Click images to enlarge for better detail!!!!!!***

Step 1:
Apply a shimmery base all over your lids & crease. I used the Wet N Wild Idol Eyes Cream Pencil in Pixi.

Step 2:
Take a light shimmery gold shade and dust it over the inner part of your lid. 

Step 3:
Take a yellow shadow and place it halfway on your lid.

Step 4:
Apply an orange color on the outer half of your lid. Also, take a hot pink color to the outer corner of your crease/lid. In the pictures, the hot pink doesn't show up so great. You can intensify the pink if you wish, but I toned down the pink. Make sure you've been blending all the colors together along the way, but not blending too much. That would make the colors look too muddy.

Step 5:
Take a purple eyeliner pencil as a base for the gel liner. This will help intensify the purple liner. Use a purple/eggplant/lavender color gel eyeliner and line your upper lash line. I used the Physician's Formula Gel Liner for Brown Eyes, and I used the purple shade. I extended the line past my lid, but I did not wing it. Then top off the liner with a purple eyeshadow.

Step 6:
Take a turquoise eyeliner and apply it to your lower lashline and waterline. I used the Wet N Wild Color Icon Turquoise pencil.

Step 7:
Then take a navy eyeliner and top the turquoise liner with it. I used the Elf Midnight Pencil. This will make a nice blue color. I didn't like the turquoise by itself, or the navy by itself. So I combined them!

Step 8:
Now, just curl your lashes & apply mascara! I first used the Rimmel Max Volume Flash Mascara on my upper lashes. Then I took the Estee Lauder Double Wear Zero Smudge mascara and applied to my top and bottom lashes. 


Now you're finished! Here's a bunch of pictures of my Tropical Sunset Smoothie Eyes! Click on the pictures to enlarge them! =)


Here are the products that I used to create this look!
Color Workshop Palette(pink, gold, and orange shadow), Revlon Sunrise Sunset Quad(purple & yellow shadow), L.A. Colors Trendy Palette(yellow shadow), Rimmel Max Volume Flash Mascara, Estee Lauder Double Wear sample mascara, Revlon lash curler, Physician's Formula Gel Liner for Brown eyes(purple shade), Wet N Wild Color Icon pencils in Amethyst and Turquoise, Elf Eyeliner in Midnight, and Wet N Wild Idol Eyes Cream Pencil in Pixi.

I hope you enjoyed this look! Feel free to tweek it, tone it down, intensify it, or do whatever you want! I hope you all have a lovely day!

=)


Monday, June 6, 2011

EOTD: Summer Baby Brown Eyes

Hello there! So it certainly feels like summer here in the south! We can't seem to get out of the upper 90's here! The humidity is also on full blast. I'm not going to lie, I'm ready for some cooler weather already! But I'm going to soak up the summer sun while I can! =)

I did an EOTD based off of a look I saw on youtube by Amarixe, or Allison. She called it "Sailor's Sunset", which she always comes up with cute names for her tutorials! Here's a link to the look she did:
http://www.youtube.com/watch?v=I03igZSN_AA

I think this is such a pretty look for summer! Her eyes are the prettiest blue eyes I've ever seen! But I don't have baby blues! My eyes are brown, so I thought I'd choose a different under eye blue color. I chose navy, because I think navy looks great with brown eyes. I used completely different products that can be found at any drugstore. Well, here we go! *** Click on images to enlarge!***
Here are some products I used:
Maybelline Shocking Seas Duo, Elf Butternut Quad, Wet N Wild Vanity Palette

Jordana Fabuliner, WNW White Pencil, ELF Midnight Pencil, WNW Pixi Pencil

Liners, in reverse order as above

Rimmel Max Volume Flash Mascara
Step 1:
Prep your eye lids with Wet N Wild Color Icon Pencil in Pixi, or any primer.
Step 2:
Apply a light shimmery gold shade to the inner corner of the lid. Then take a yellow gold over the rest of your lid. I used the WNW Color Icon Palette in Vanity. I used the white & yellow golds.
Step 3
Apply a bronze shade to the outer v and crease area. I used the shimmery bronze shade in the ELF Butternut quad. Blend all the colors out. Use the cream color in the WNW Vanity palette as a highlight.
Step 4:
Line your waterline with a white eye pencil. I used a WNW Color Icon pencil. Then take a navy eyeliner(I used ELF Brightening eyeliner in Midnight....but I don't recommend this pencil...not very smooth!) and line your lower lash line. Top this liner off with a navy eyeshadow. I used the Maybelline duo in Shocking Seas and mixed the 2 blues together.

Step 5: Line your top lash line with a black liner. I used the Jordana Fabuliner Pen.
Step 6: Curl your lashes & apply mascara & you're done! I used the Rimmel Max Volume Flash Mascara. I just opened this tube, and the formula sucks when you first use it. So my lashes aren't looking their best in these images! LOL I also forgot to clean up some messes here and there, but I got the job done.
Here are a bunch of pictures of my eyeballs!


Well, I hope you enjoyed this look! It looks alot better in person. I have trouble photographing my own eyeballs! Especially up close! I hope you take a look at the tutorial Amarixe did! She is a sweet girl & has a great channel. 

Happy (super hot & humid) summertime!!

=)